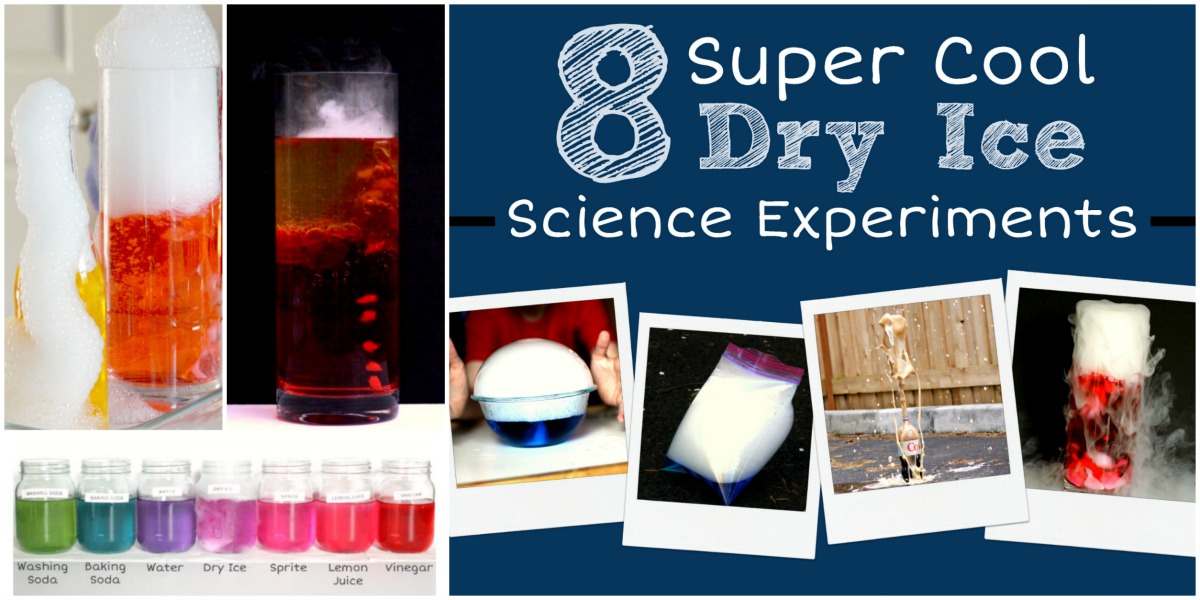
We are totally getting our mad scientist on up in here. Bwha-ha-ha-ha-ha! Last year we made our Magic Bubbling Potion with dry ice and water for the first time, which was a huge hit. This year we added even more fun. SEVEN TIMES the fun with dry ice water. These are dry ice experiments my kids can’t get enough of!

Dry ice is extremely awesome, but you need to be careful with it. Safety Warning: Never touch it with your fingers, never put it in your mouth, never lock it in a closed container. Dry ice is solid carbon dioxide and it is very cold, even colder than regular ice. It is so cold it can actually burn your skin and give you frost bite. It also sublimes, or turns from a solid to a gas, quickly, which makes it dangerous when contained. If you put some dry ice in a bottle never put the cap on.
That being said, dry ice is nothing to fear when handled correctly. Just be sure you are wearing gloves when you pick it up, or use tongs, and you will be fine. We have used dry ice around our house often enough now that even my two-year-old knows how to handle it safely.
Ready for seven magical and spooky ways to experiment with dry ice? Let’s get started.
#1 – Dry Ice + Water
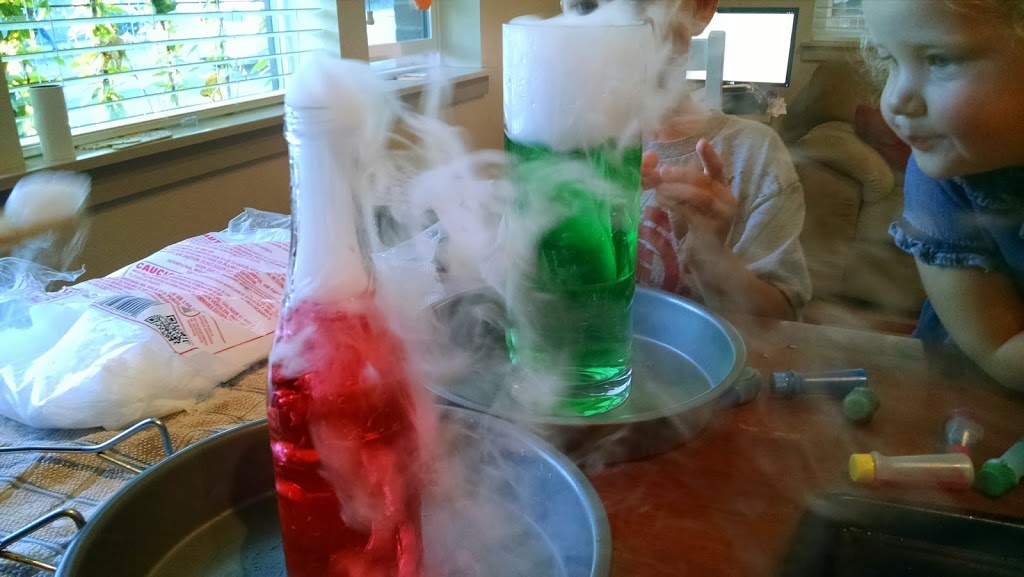
The first in any good dry ice demo is plopping a chunk of it into a container filled with warm water. This creates some pretty impressive “smoke” that the kids love. The “smoke” is really just carbon dioxide, the same stuff we exhale when breathing. Dry ice sublimes, or turns directly from a solid to a gas, which is what creates the bubbles you see in the water. Kids always want to put their hands in the “smoke” and feel it, which is totally safe and fine. Add some food coloring to your water for extra pizzazz 🙂

#2 – Inflate a Balloon
Put a deflated balloon over the opening of one of your bottles and watch it grow bigger and bigger! The balloon catches all the carbon dioxide gas as it sublimes. Draw a ghost or a spider on your balloon for extra Halloween credit. Be sure to take your balloon off before it gets too big. If you leave it on there too long it could potentially overfill the balloon and explode it, which would be bad. And loud.

We filled up a balloon and then tied it off and played with it. I was amazed to feel how much heavier it was than a regular balloon! Carbon dioxide is more dense than air, which means it will always settle as low to the ground as possible. Fill up a balloon with carbon dioxide on one of your bottles and then blow up another balloon by blowing into it and you to feel the difference for yourself.
#3 – Blow a Big Bubble
We got this idea from Steve Spangler, who has really great detailed instructions on how to make your own special bubble tube. The kids love popping the giant bubble to watch the carbon dioxide fog escape.

#4 – Put out a Fire
We already know that fire needs oxygen to burn. Deprive a fire of oxygen and it will go out instantly. We tested this by simple lighting a match and holding it in the carbon dioxide fog. Sure enough, it went out immediately! Safety Warning: Don’t let your kids play with matches. Only adults should be playing with matches here 🙂

#5 – Dry Ice + Water + Dishsoap
This is where the real magic begins. Add a squirt of dishsoap to your dry ice and water and watch as thousands of bubbles full of fog overflow onto the table. We also got this idea from Steve Spangler, who has an awesome description of what is going on. This is a demo that your kids won’t be able to keep their hands out of 🙂
We experimented a bit with the shapes and sizes of the containers we used. It was pretty cool to see how the bubbles erupted out of each container so differently. We used one bottle with a narrow neck, which make the stream of bubbles tumble out like a snake. Tommy wanted to try using a larger bowl, which make the bubbles grow and simmer like a big white brain. It was pretty cool!


#6 – Dry Ice + Water + Dishsoap + More Food Coloring + Paper
I’m going to call this bubble prints. Once you get your bubbles erupting in experiment #5, add a drop of food coloring on top of the bubbles. The color kind of sits right on top. Then grab a piece of paper and lightly dab it over the colored bubbles. It makes this really cool bubble tie-dye pattern on the paper. Once dry, use it to make cards and decorations, or just hang it up on your art wall!


If you want to make bubble prints without using dry ice check out my easy instructions here!
#7 – Carbonate Your Own Beverage
Plop a few chunks of dry ice into a pitcher full of Kool-Aid or lemonade, wait until the dry ice has completely sublimated (around 20-30 minutes), and voila! You have your own sparkling soda. This is a fun treat to enjoy after all your hard work experimenting. The fizz will stay in your drink for a couple of hours before it goes flat again.

I hope you enjoy these experiments as much as we do. One of our Halloween traditions is spending a couple of hours one afternoon doing all of these experiments. The kids get totally into it every single time. And the adults have just as much fun experimenting and coming up with new ideas to try.
*You can buy dry ice at most grocery stores. Call ahead first to see if they sell it or if they know where to get it. The store may ask for your ID, since minors aren’t allowed to buy it. I usually buy about four pounds of it, which keeps us playing for at least 2-3 hours.
**If you have a bunch of dry ice in a bottle for awhile sometimes it will cool down the water so cold that the dry ice stops subliming and just starts freezing the water around it instead. If this happens, simply dump out the cold water in the sink and refill your bottle with warm water. The dry ice will immediately begin bubbling vigorously again 🙂
More Dry Ice Experiments for Kids –>
STEM Saturday

Looks like a lot of fun! Glad to have you join the Saturday Science Blog Hop!
Thanks, so glad to be part of the group!
i love kitchen science. would you come by and share on our kids in the kitchen linky this week https://sciencekiddo.com//lookwhatmomfound.com/2014/10/spicy-oatmeal-raisin-butterscotch-cookies-kidsinthekitchen.html
Done! Thank you for letting me know about your Linky party. I have added it to my list. We do a ton of kitchen chemistry so I’ll be sure to link up when we do 🙂 Those cookies look UH-mazing, by the way 🙂
My son has been learning a lot about dry ice lately, and I want to make sure I do some things with it to make him more interested in it. This being said, I really appreciate you letting me know of some fun and safe experiments I can try out to better intrigue my son. Thanks a ton for sharing this with me.
My son is in second grade and has to come up with a science experiment and I think that it would be awesome for him to do something with dry ice. I think that he and his classmates would really like to do the big bubble activity. However, do you think that a second grader would be able to make his own bubble tube and perform this experiment or should this be something that an adult does for him instead?
Hi Faylinn,
I think that making a bubble tube and performing the big bubbles experiment is DEFINITELY something your son could do! The only safety concern the dry ice. Just make sure he knows he could burn himself if he touches the dry ice directly. Maybe an adult could help him get the dry ice into the water. But beyond that, I think it’s definitely a great experiment that he can feel proud of sharing with his friends!