Making paper circuit cards is the perfect union of science, technology, art, and design. For that reason, this activity fits perfectly into any STEAM or STEM curriculum at school, for library events, or just for fun at home. Let kids unleash their creativity as they experiment with paper circuit art and create a unique card that really lights up!

Awesome Science Experiments for Kids
*This post contains affiliate links. Please see our disclosure policy.
If you enjoy making paper circuit cards you are going to LOVE my new book, AWESOME SCIENCE EXPERIMENTS FOR KIDS. It contains over 100 colorful and creative STEAM activities for kids ages 5-10. I wrote it with parents and grandparents in mind so the instructions are simple and the experiments only require supplies you probably already have at home.
Making paper circuits is one of the 20 experiments in the Technology chapter of the book!

Be sure to scroll to the end of this post where you will find a link to the popular 28 Days of STEAM series going on this month! The most brilliant bloggers on the web have come together to share their best science, technology, engineering, art, and math activities all in one place. Don’t miss it!
Just a few short years ago I was actually really intimidated by circuits. I have a Master’s Degree in chemistry, but a few bad experiences in high school physics left me feeling doubtful in my electrical circuit abilities.
Luckily I have a son who loves circuits, programming, and building. He forced me out of my comfort zone when we bought him this snap circuit set for his fifth birthday. I discovered at that point that circuits are really cool and really simple!
Making paper circuit cards is nothing to intimidated by. With a little bit of patience and perseverance anyone (even my six-year-old) can make one!
Getting Ready
Before inviting the kids over to make their paper circuit cards I gathered the following supplies:
- Card stock paper
- Copper tape, ¼ inch wide and double-sided conductive (available online for about $6 or in hardware stores as “slug tape”)
- Scissors
- 3V lithium button battery
- 5mm LEDs of assorted colors
*Safety Note* Button batteries are very dangerous if they are swallowed. Please be sure that the children making paper circuit art are old enough not to put objects into their mouths. After the paper circuit cards are complete, please instruct the children not to leave them in a location where a younger brother or sister can get to them.
I did this activity with my six-year-old and my eight-year-old, but we waited until the two-year-old was napping to do it! Once we were done I promptly gathered the button batteries, counted them to make sure we didn’t leave any lying around, and returned them to a safe place.
My husband and I each made our own paper circuit cards the night before I planned to make them with the kids. Once I showed the kids how our cards worked and explained that they could make their own, they were all in!
How to Make a Closed Circuit
There’s nothing too complicated about making a circuit that actually works. All you have to remember is that there must be a direct path from the negative end of the battery, through the light, and back to the positive end of the battery.
On a 3V button battery, the negative side is usually the bottom of the battery while the positive side is the top. It will be labeled on the battery.
If you look at the 5mm LED you will notice that it has two pins. One pin is slightly longer than the other one. The longer pin is the positive end and the shorter pin is the negative end. This matters!
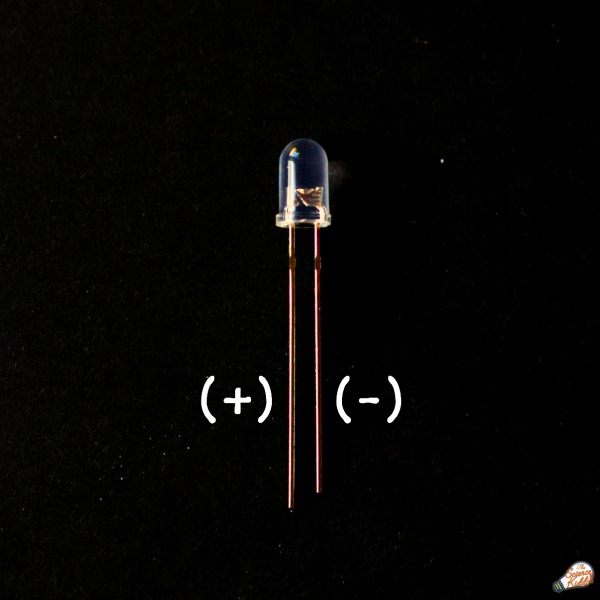
Electrons must flow from the negative end of the battery to the negative end of the LED. If the LED is oriented incorrectly it will not light up.
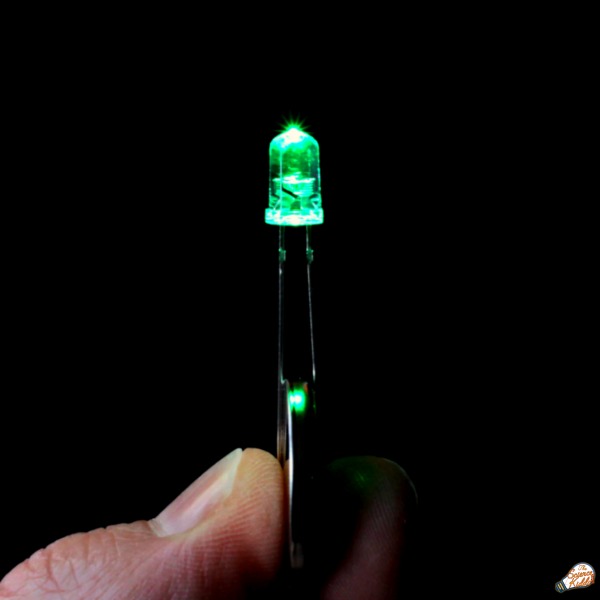
Before committing to a circuit with tape I like to test the LED to make sure it works. Place the negative LED pin on the bottom of the battery and the positive end on the top of the battery. It should light right up!
That’s all you really need to know to construct a circuit that works! Easy, right?
Constructing Paper Circuit Cards
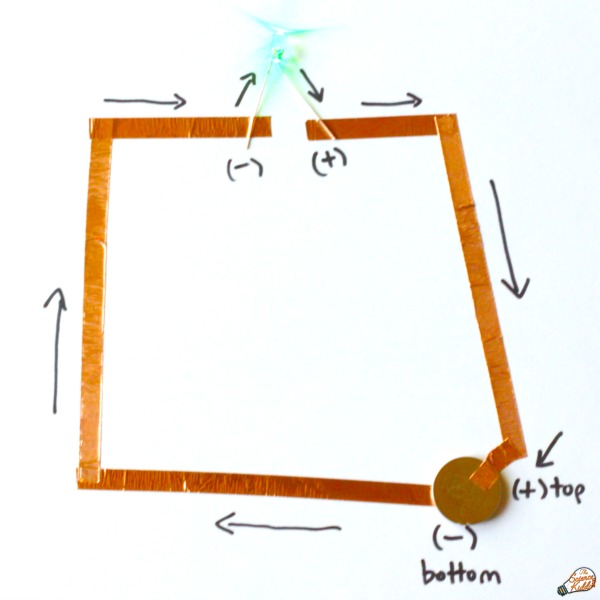
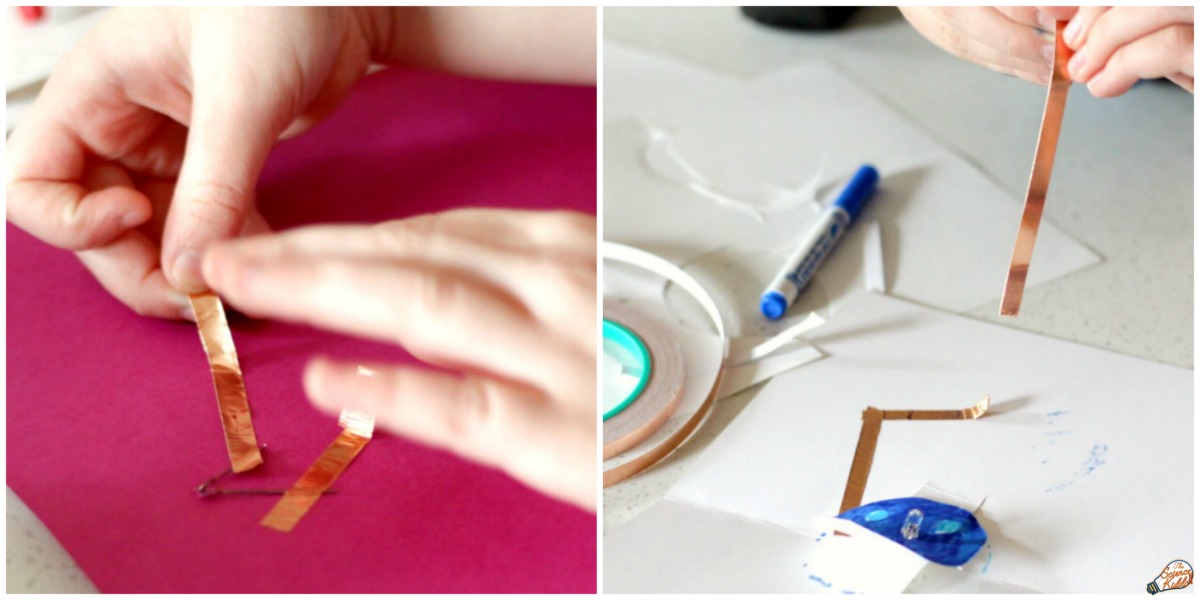
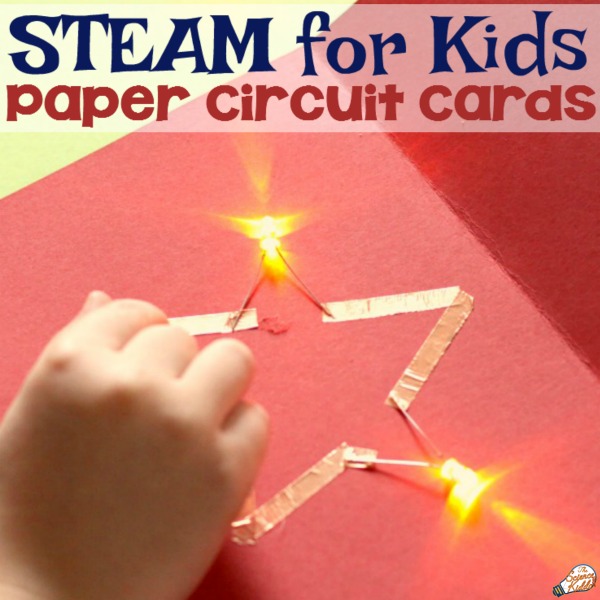
First, I showed the kids how to make a simple circuit. I placed copper tape on some card stock in the shape of a rectangle, leaving one small gap along one of the sides. Three of the corners of the tape were connected while I left a gap between the ends of the tape in the fourth corner.
I used copper tape to attach each pin of the LED to either side of the gap. It’s really important that the two pins don’t touch each other and that there is a gap in the tape so that the light doesn’t get short circuited.
I placed a coin cell battery in the open corner so that it touched only one end of the copper tape. Using another piece of copper tape, I connected the top of the coin cell battery to the other end of the tape in the corner.
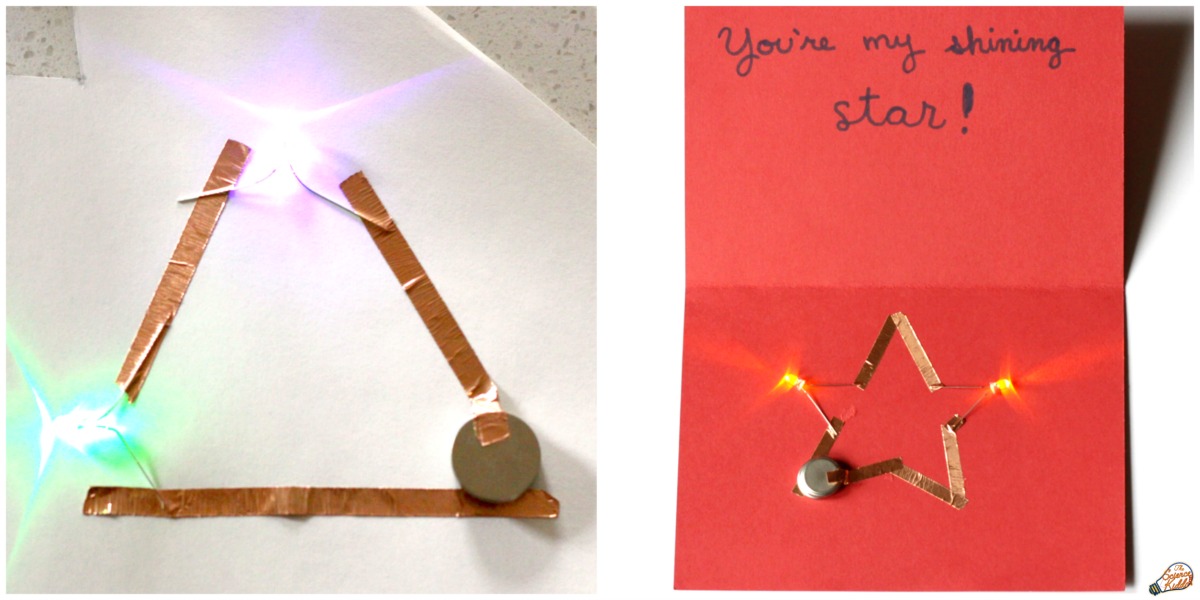
The LED lit right up!
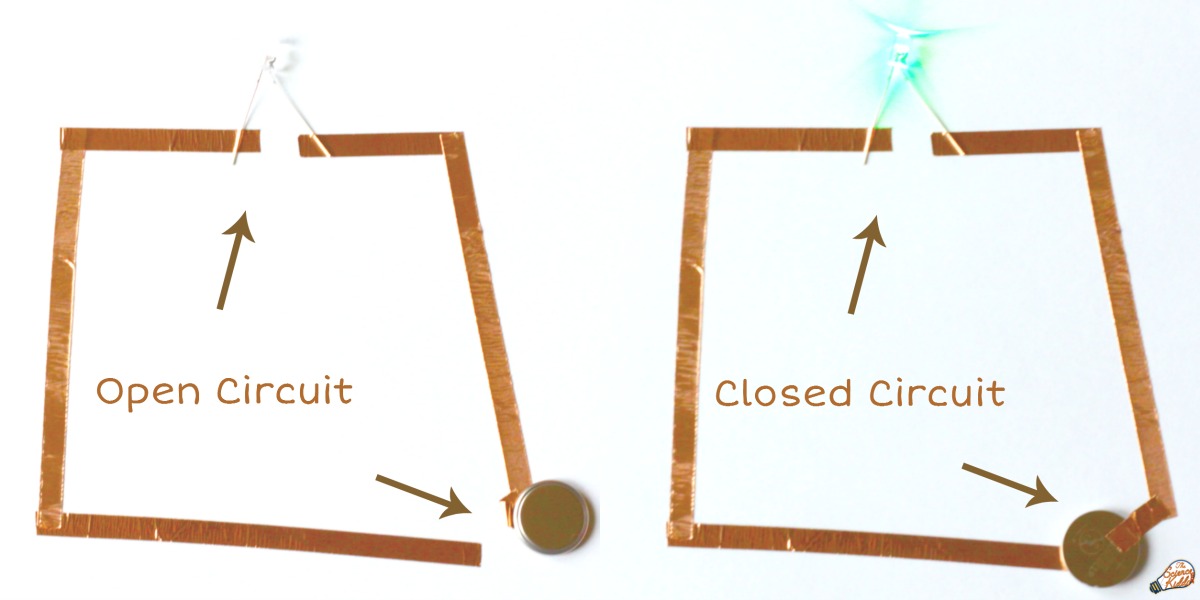
If the LED doesn’t light up when you try this, simply flip the battery over and try again. Check all the connections to make sure there is a continuous path from the negative end of the battery, through the negative pin of the LED, out the positive pin of the LED, and back to the positive end of the battery.
Once I showed the kids the basics of how to construct a simple paper circuit I let them loose to create their own.
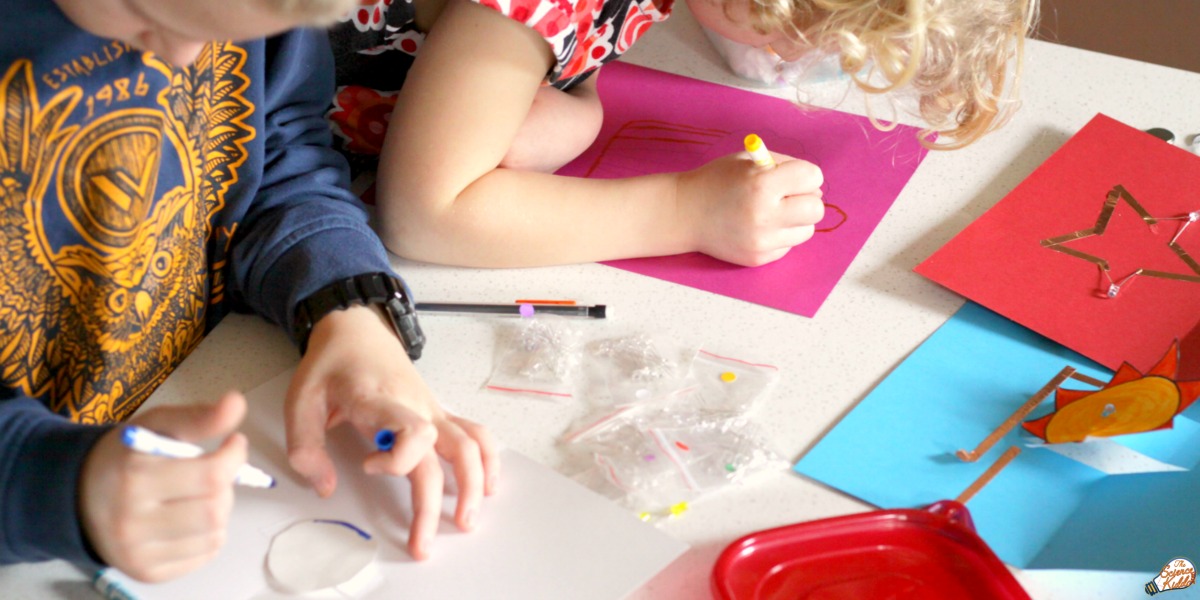
They used markers, scissors, tape, and stickers to design a cute card. At the end they each added a light-up feature using a circuit. My six-year-old created a cupcake with a cherry on top that lit up while my eight-year-old made a pop-up moon card with a blue LED in the center of the blue moon.
Making Paper Circuit Cards with Two LEDs
There are a couple of different ways to create a circuit with two LEDs. This took some experimenting on our part, but isn’t what this activity is all about??
One option is to arrange the lights in series. This means that the electrons flow from the battery to one light, through copper tape to another light, and then back to the battery.
My husband made a star paper circuit card using two lights in series. To get both of them to light up we actually had to stack two batteries on top of each other to provide enough current!
A second option is to construct a circuit with the lights in parallel. This basically means that each light has its own unique path to and from the battery, independent of the other light.
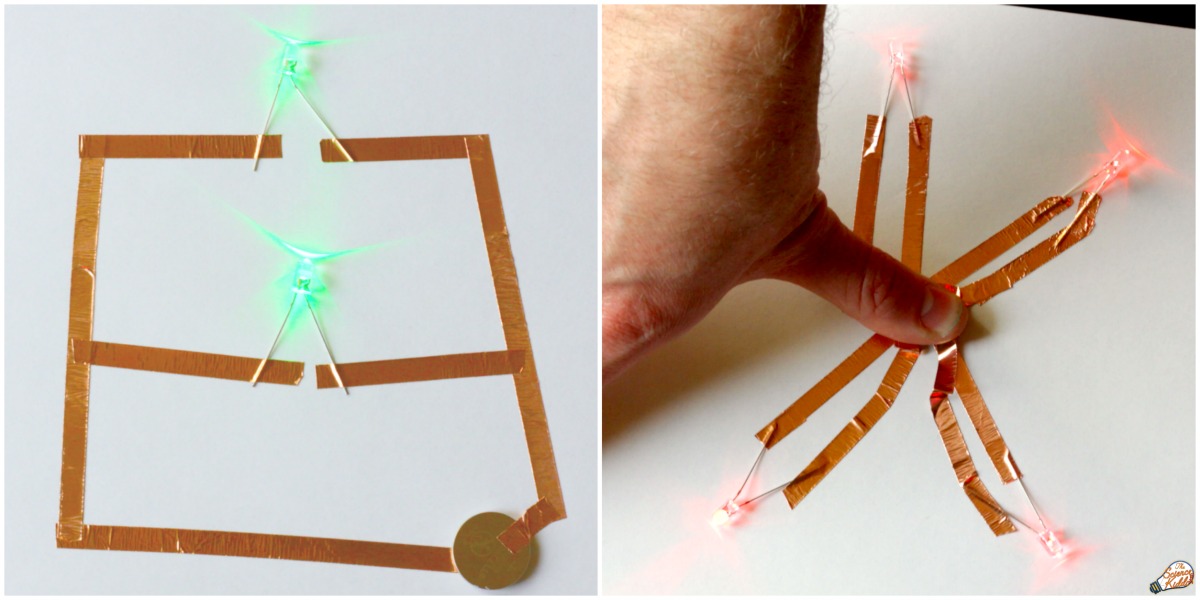
I showed the kids how to do this by constructing a simple circuit with two lights in parallel. We only needed one battery to power them both up!
Once I had a little bit of confidence I made another circuit with four lights in parallel!
A Few Questions to Ask
One of the things I love most about activities like this is I feel like I learn just as much as the kids do! Long after they were done making their paper circuit cards, I was still at the table experimenting to see how many lights one battery could turn on in parallel, if it mattered what color the lights were, if they had to all be the same color, and so on.
Sometimes constructing circuits can be frustrating. Instead of letting kids give up, ask them questions about what is happening. See if they can solve the problem.
What is the importance of leaving a gap in the copper tape for the LED to bridge? Why does it matter which direction the LED is attached? Why do lights arranged in series need more batteries to work? How are the electrons flowing through the circuit? What else can you try?
I go through this process, too. I tried to construct a rainbow circuit in parallel that just wasn’t working. Hours later, right before bed, I realized that I had short circuited my whole design! I experimented the next day with more success. (Even then I didn’t get it to work exactly as I wanted. That’s part of the journey of learning and discovery, though, right?)
Be patient, keep trying, and see what you can create!
Here are a few more creative circuit ideas to try using the same materials we used to make our paper circuit cards:
- DIY Paper Circuit Board Game :: Share It! Science
- Light Up and Pop Up Flower Circuit Card :: Left Brain Craft Brain
- Circuit Bugs :: STEAM Powered Family
More Simple Experiments for Kids
If you love this activity, be sure to check out my new book, AWESOME SCIENCE EXPERIMENTS FOR KIDS. It’s packed with colorful and creative STEAM (Science, Technology, Engineering, Art, and Math) activities just like this one!

More Hands-On STEAM for Kids –>


28 Days of STEM Activities and STEAM Activities for Kids
Don’t miss it!
Looking forward to it.
how will we learn about electricity and circuits from this experiment?
If you get the light to go on, you’ve learned how to make a circuit!
I have done these circuits with my students. Just a suggestion if you extend the circuit to the end of the paper and them fold the corner over so that the battery is sandwiched between the copper tape it will hold the battery a little more secure. I use card stock and tape the battery on just at the edge so it creates a button. I hope that made sense.
This is great advice, thank you!
Your ideas are so interesting and I am sure kids will have a great time learning. It’s so difficult to find activities which is fun and also helps kids into learn something. Thanks for sharing!